
Vibelets

Building and sharing guides

How to build, change
and share your app.

Follow the steps to build your first app, improve a request, share with other people or connect a calendar. Each guide includes instructions and examples.

Guide 01

Your first vibelet, in three steps

Build a shared shopping list, test it in the preview and publish a link for your family.

  1. 01Describe

    Describe who will use the app and what they need to do.

  2. 02Try & refine

    Use the preview. Ask for one change.

  3. 03Share

    Sign in, publish and send a sharing link.

See it in action · 15 seconds

From a small idea to your first vibelet.

A prompt you can start with

Build a shared shopping list for my family. Let us add an item and quantity, group items by store aisle and mark them as bought. Everyone using the same link should see the same list. Make it easy to use on a phone.

Opens in Studio, ready to edit. Building starts when you send it.

Compare a vague request with a specific one.

Before

Make me an app.

Try this instead

Make a shared shopping list for my family. We need to add items and mark them as bought, on our phones.

Read the full guide

1. Describe who will use the app and what they will do

Explain your idea in your own words. Tell Vibelets who will use the app and what its most important job is. A rough idea is enough. Try this:

Build a shared shopping list for my family. Let us add items, group them by store aisle and mark them as bought. Make it easy to use on a phone.

Try building as a guest, without signing in. Create an account when you’re ready to save and share your work. If you’d rather start from an example, visit the Community → Explore vibelets and remix a vibelet into your own version.

2. Try the app, then ask for a change

Test the first version in the preview. Use the conversation to describe what you would like to change or add. You can return to the same vibelet and keep improving it later. For example: “Add a quantity to each item” or “Make the buttons easier to tap on a phone.” Test the main action before adding more.

3. Publish and share

Publish the version you want others to use, then create a sharing link. Choose whether the link requires sign-in, is limited to named recipients and allows editing of the shared data. Open the link yourself to check the experience before sending it to others.
Guide 02

Write a clear request for an app or a change

Specify users, fields and rules, then test each change with example data.

  1. 01Who is it for?

    Name the people and their task.

  2. 02What should happen?

    Describe the result and the rules.

  3. 03Try one change

    Keep what works. Test the next step.

See it in action · 35 seconds

Small edits. A vibelet that feels like yours.

A prompt you can start with

Improve my task list while keeping its current layout and saved tasks. Move completed tasks into a collapsed Done section. Show unfinished tasks first, with overdue tasks clearly marked. Make the main buttons easier to tap on a phone.

Open Studio

Copy this prompt into the conversation for the vibelet you want to improve.

Compare a vague request with a specific one.

Before

Make it better.

Try this instead

Keep the layout, but put completed tasks in a collapsed Done section and make the Add task button larger.

Read the full guide

Describe the job, the people and the rules

Describe the actions the app needs to support. Who uses the app? What information do they add? What should happen next? Mention the important rules rather than trying to specify the implementation.

Build a task list for our volunteer group. Each task has an owner and a due date. Show overdue unfinished tasks first. Let us filter tasks by assignee and show a clear completed state when a task is done.

Build the smallest useful version first

Start with the main flow: add a task, assign it and finish it. Try it with a few realistic records. Then add filters, reminders or a dashboard. Smaller, specific changes make it easier to see what works.

Explain the result you want

“Make it better” leaves a lot to interpretation. Try “Keep the current layout, but move completed tasks into a collapsed section” or “Use larger text and buttons so this works well on a phone.” For a visual change, you can select an element in the preview and describe what you want to change.

Test what could go wrong

Try an empty list, a long title and a missing field. Check the app on a phone and through the sharing link with the access you intend to give other users. When something fails, describe what you did, what happened and what you expected.

Guide 03

Choose who can open and update your app

Choose who helps build the app and who uses it. They don't have to be the same people.

  1. 01Publish

    Choose the version people will use.

  2. 02Choose access

    Decide who can open the link and edit data.

  3. 03Check the experience

    Try the link with the intended access.

See it in action · 35 seconds

Small edits. A vibelet that feels like yours.

A prompt you can start with

Build a shared task list for our volunteer group. Each task has a title, an assignee from the participant list, a due date and a Done checkbox. Let everyone using the same sharing link see updates. Make the main task flow easy to use on a phone.

Opens in Studio, ready to edit. Building starts when you send it.

Compare a vague request with a specific one.

Before

Let everyone use it.

Try this instead

Our volunteer group should share one task list. We need to assign tasks, set deadlines and mark work done.

Read the full guide

Invite people to help build

Add collaborators to the vibelet’s conversation when you want to work on the same app together. Discuss ideas, try the preview and request improvements in one shared workspace. Agree on the next change so requests stay focused.

Give app users the right access

Share a published version with a link. Depending on your audience, require sign-in, allow only named recipients or let people open a public link. Choose whether the link lets its users edit the app’s data.

Building access and app access are different: using a shared app does not automatically make someone a collaborator in its building conversation.

Describe permissions in your prompt

Tell Vibelets which records users should see or change. For example: “Everyone can see the event schedule, but each person can only edit their own RSVP.” Check these rules using the sharing link, not only the owner’s preview.

Use participants for assignments and email

Manage the participant list in Vibelet settings when your app needs to select people by name or send them email. Ask for the behavior you want: “When I assign a task, email the assignee with its title and due date.” Email recipients are restricted to the participant list; test with an allowed recipient.

Guide 04

Put several apps on one collection page

Put task lists, notes and other apps on one page, then choose who can open it.

  1. 01Bring apps together

    Create a collection for one audience.

  2. 02Shape the page

    Arrange apps, text and images.

  3. 03Invite your people

    Choose public or restricted access.

A prompt you can start with

Build a simple team idea backlog. Each idea has a title, a short description, an owner and a status: New, Considering or Done. Let us filter by status and keep the data shared. I will add this vibelet to our team collection beside our task list.

Opens in Studio, ready to edit. Building starts when you send it.

Compare a vague request with a specific one.

Before

Put everything in one huge app.

Try this instead

Keep our task list and idea backlog as separate vibelets, and bring them together in one team collection.

Read the full guide

A collection brings your vibelets together on a page of your own. Use it for a team workspace, a family hub or a set of tools for your customers. The Explore vibelets under Community is the separate public library where people discover and remix community creations.

1. Create your collection

Sign in to Studio and open My collections beside your profile. Choose Create new collection, give it a title and choose its web address. You can create several collections for different projects or audiences.

2. Add the vibelets that belong together

Use Publish to collection from a vibelet’s workspace menu or preview actions. Choose the collection and the version to publish. You can include the same vibelet in more than one collection.

You can also build a new vibelet from the collection page. For example, put a task list, meeting notes and an idea backlog in one team hub, so people don’t need to keep track of three different links.

3. Arrange the apps, text and images

Open the collection and choose Manage collection → Edit page. Add text, images and sections, arrange your vibelets and display them as cards or embedded apps people can use right on the page.

Use Describe changes to ask for a different look or a more complete solution. Try: “Make this a welcoming team hub with a short introduction, our task list and meeting notes side by side.” Review the proposal before accepting and publishing it. Changes to existing vibelets can also affect their other sharing links, so check the result before publishing.

4. Choose who can use it

Make a collection public or restrict it to selected registered users. In a restricted collection, its dedicated vibelet links follow the collection’s membership. In a public collection, individual vibelets can still require sign-in or access for named recipients.

Give members a Viewer or Contributor role. Contributors can send copies of their own vibelets into your collection; you own and manage the accepted copies. Share the collection’s page link as one starting point for your audience.

5. Configure shared data and AI budgets

Adding apps to a collection doesn’t automatically connect their data. Enable data sharing when you want vibelets to use each other’s data, then describe the connection in your prompt. For example: “Use the customer list from our CRM when choosing a customer for a quote.” Permissions still apply; check the data-sharing settings carefully before sharing publicly.

Each collection has a monthly AI usage budget. AI used through its collection links consumes the owner’s credits and counts towards that budget. Building and background automations have their own existing billing and limits; the collection budget isn’t a cap on everything your account does.

Guide 05

Add AI summaries and scheduled reminders

Add an AI summary button or schedule email reminders for unfinished tasks.

  1. 01Describe the input

    What should the AI read or search?

  2. 02Review the result

    Make suggestions easy to check.

  3. 03Set the timing

    Choose the conditions, schedule and limits.

A prompt you can start with

Add a button to my meeting-notes vibelet that uses AI to suggest decisions and next steps from the selected notes. Show the suggestions for review before saving anything. Do not run AI automatically when the app opens.

Open Studio

Copy this prompt into the conversation for the vibelet you want to improve.

Compare a vague request with a specific one.

Before

Send reminders.

Try this instead

Every weekday at 09:00 Europe/Helsinki, email each assignee about unfinished tasks due within three days. Send once per task, due date and assignee.

Read the full guide

Ask for an AI feature inside the app

Be clear about the input and the result. For example: “Add a button that summarizes these meeting notes into decisions and next steps.” For fresh information, explicitly ask the feature to search the web and include sources. Vibelets provides the AI connection; you don’t need your own AI API key.

AI can make mistakes. Make the result easy to review, especially before it changes important records or is sent to other people.

Say when the automation should run

Background automations can react to a schedule or a change in saved data. Describe the timing, timezone, conditions and action. Be specific about repeats:

Every weekday at 09:00 in Helsinki time, check unfinished tasks due within three days. Email each assignee a reminder. Send at most one reminder per task, due date and assignee combination.

Or try: “Every Monday, find this week’s calendar events and email me a summary.” Your app does not need to stay open for a scheduled workflow to run.

Review the settings and try a run

Open Vibelet settings → Background automations to check the schedule, pause an automation or inspect recent runs. Test with a small set of data and approved recipients before relying on it. Review the result and adjust the request if needed.

Set an AI budget and check usage

AI inside a shared vibelet and AI used by its automations consume the owner’s credits. Check credit usage and budgets in Vibelet settings. Set a schedule that matches the real need: a daily summary usually doesn’t need to run every few minutes. See Pricing for the current credit policy.

Guide 06

Connect Outlook, Google Sheets or Stripe

Bring your Outlook calendar, Google Sheets and Stripe payments into the apps you build.

  1. 01Choose a connection

    Outlook, Google Sheets or Stripe.

  2. 02Grant access

    Connect your account and allow the needed actions.

  3. 03Try a small example

    Check the result before relying on it.

A prompt you can start with

Build a page that shows available 30-minute slots from my connected Microsoft 365 Outlook calendar for the next seven days. Use weekdays from 09:00 to 17:00 in Helsinki time. Let visitors email me a meeting request with their name and contact details. Explain which connection settings I need to approve.

Opens in Studio, ready to edit. Building starts when you send it.

Compare a vague request with a specific one.

Before

Connect my tools.

Try this instead

Show my available half-hour slots for the next seven days. Let visitors send a meeting request by email; do not create calendar events.

Read the full guide

Start with what your app needs to do

Vibelets currently has built-in connectors for Microsoft 365 Outlook, Google Sheets and Stripe. Describe the connection in your prompt. When the builder asks for it, open Vibelet connections, connect your account, review what this vibelet may do and save. The builder then continues with your saved configuration. You need a registered Vibelets account to connect a service.

You can also manage connections under Vibelet settings → Vibelet connections. Connecting a service is separate from using Google or Microsoft to sign in to Vibelets. Your app uses the owner’s approved connection; each visitor does not connect their own account.

Microsoft 365 Outlook

Show available 30-minute slots from your Microsoft 365 work or school calendar. Choose the weekdays, hours and time zone, and how far ahead people can look, up to 30 days. Your existing event titles, descriptions and attendees are not shown to app users.

Build a page that shows my free half-hour slots on weekdays from 08:00 to 17:00 using my Outlook calendar. Let visitors send me a meeting request by email, with their name and contact details.

An email request does not reserve the slot. For actual calendar entries, ask the builder for event creation and enable Allow this vibelet to create events in my calendar. Approve the additional Microsoft permission and save. Vibelets checks availability before creating the event. Event creation does not send attendee invitations or create a Teams meeting link.

Read-only share links can show free times. Submitting requests or creating events requires a share link with write permission and the corresponding connection settings. Your organization may require an administrator to approve Microsoft access.

Google Sheets

Use a selected spreadsheet tab as your app’s shared data source. Your vibelet can read rows, add rows or update rows, with each action controlled separately in its connection settings.

Create an enquiry form that adds each submission to my Google spreadsheet. Visitors must not be able to read other people’s submissions.

Connect Google, choose a spreadsheet through the Google file picker, select one tab and save. Access is limited to files you select, and the vibelet uses only the approved tab and actions. The first row must contain unique, non-empty column headings. The current connector supports up to 50 columns and 5,000 data rows. Reading, adding and updating are supported; deleting rows is not.

For a public form, enable Add rows and leave Read rows off. When reading is enabled, authorized app users can see the selected tab’s rows; the connector does not automatically hide rows belonging to other people. Write actions also require write permission on the share link.

If you rename, add or remove columns, review and save the connection again, then update the app to match. Test with a small sample sheet before using important business data.

Stripe payments

Sell products or services from your connected Stripe account, or charge a one-time fee for access to a vibelet’s protected data and AI features. Maintain products and prices in Stripe, then select which ones this vibelet may sell.

Build a page for my massage services. Use my selected Stripe products and let customers pay for the treatment they choose.

Start in sandbox, test your app, then separately connect and activate live payments. See How to sell with your vibelet for the full setup, supported payment types and fees.

Review access before sharing

Give each vibelet only the actions it needs. A public link can expose the data or actions you approve, even though the service account belongs to you. Test the actual share link with another user. You can remove an individual vibelet’s grant or disconnect an account across your vibelets from connection settings. Disconnecting does not undo data writes, calendar events or purchases that have already happened.

Guide 07

Take payments for services or app access

Sell your products, services or one-time app access with Stripe, from a sandbox test to live payments.

  1. 01Connect Stripe

    Set up your account and products.

  2. 02Test the purchase

    Use sandbox mode to check the whole flow.

  3. 03Go live deliberately

    Review the offer and explicitly activate live payments.

A prompt you can start with

Build a simple service catalogue for my massage studio. Show a 30-minute and a 60-minute treatment with descriptions and a one-time Stripe checkout. Start in sandbox mode. Show the purchase result clearly and do not activate live payments automatically.

Opens in Studio, ready to edit. Building starts when you send it.

Compare a vague request with a specific one.

Before

Add payments.

Try this instead

Let a customer buy one treatment through Stripe checkout. Start in sandbox and show a clear confirmation after a successful purchase.

Read the full guide

Choose what you want to sell

The Stripe connector supports two options:

  • Products and services: let customers choose from products you maintain in Stripe, such as different massage treatments or service packages. A product purchase does not grant access to the vibelet.
  • Vibelet access: require a one-time purchase before a registered buyer can use the vibelet’s protected server-backed data and AI features. Access does not give the buyer permission to build or edit the app.

Both options use products and prices from your connected Stripe account. The current connector supports fixed one-time prices in EUR or USD, from 1 to 10,000 in the selected currency. Each checkout is for one product, quantity one. Subscriptions, shopping carts and usage-based billing are not currently supported.

Connect your payment account

Tell the builder what customers should be able to buy, then open Configure Stripe connection. Select Sandbox, choose your account country and connect your payment account. Follow the guided setup on Stripe’s page, including any business and identity information it requests.

Create products in Stripe and select them in Vibelets

  1. In connection settings, choose Manage products in Stripe to open your connected account’s Dashboard.
  2. Create your products, descriptions and supported one-time prices in Stripe’s Product catalog. You can give each service its own price.
  3. Return to Vibelets and refresh products if needed. Choose Products and services and select up to 25 products, with one price per product. For Vibelet access, select exactly one product and price instead.
  4. Save the payment settings. If you opened them from a builder request, the builder continues with your selection.

Only approved products and prices can be sold through that vibelet. Maintain their names, descriptions and prices in Stripe. Buyers pay on Stripe’s hosted Checkout page; the app does not collect card details itself.

Test first, then activate live payments

Sandbox uses test accounts, products and payments, without charging real money. Studio preview always uses sandbox. Test the published share link too, including cancellation, returning from Checkout and checking payment status. For paid app access, use a separate registered test buyer: the owner’s preview access is not proof that a purchase worked.

When ready, open the connector on play.vibelets.app, select Live and complete the live payment account setup. Create or select your live products and prices; sandbox products and purchases do not carry over. Select Use this payment environment on share links after saving, save and confirm the switch to real payments. Stripe must have enabled card payments on your account. Changing the environment selector alone does not switch your shared app.

Understand payment status, fees and credits

Vibelets verifies a payment with Stripe before marking an order paid or granting access. A return from Checkout alone is not proof of payment. Product customers may pay as guests; paid vibelet access requires a registered buyer. Review product orders and customer contact details privately in connection settings. Use Stripe Dashboard for refunds, disputes, receipts and payment administration.

Vibelets takes a 5% platform fee from each payment. Stripe’s processing fees are separate. As the seller, you remain responsible for your products, fulfilment and applicable taxes; automatic tax calculation is not part of this connector. Full refunds or unresolved or lost payment disputes revoke app access associated with that purchase; partial refunds retain access.

AI used inside your vibelet still consumes your Vibelets credits, including when testing in sandbox. Customer payments do not top up your Vibelets balance. Price your offering with those operating costs in mind.

Paid access protects server-backed data and AI operations. Do not place private paid content directly in the app’s public HTML.

Guide 08

Remix a community vibelet and ask questions

Try public apps, remix a vibelet and ask for help in the forum.

  1. 01Explore

    Try public vibelets and themed galleries.

  2. 02Remix

    Create your own editable version, then ask for changes.

  3. 03Join the conversation

    Ask a question or share what you learned.

See it in action · 30 seconds

Find a vibelet and remix it.

A prompt you can start with

Adapt this vibelet for our book club. Keep its working list and saved data. Add fields for the book title, author, meeting date and a short discussion note. Use a warm, calm style and make it easy to update on a phone.

Open Studio

Copy this prompt into the conversation for the vibelet you want to improve.

Compare a vague request with a specific one.

Before

Make something like this.

Try this instead

Keep the working list, but adapt its fields and labels for our book club: title, author, meeting date and discussion notes.

Read the full guide

Explore vibelets

Open Community → Explore vibelets to try reviewed public apps. Filter by topic and open a vibelet to try it. Choose Remix to create your own editable version without changing the original. Sign in to remix; browsing needs no account. Discuss opens conversations about that particular vibelet.

Join a discussion

Forum, accessible from the main navigation and Community tabs, is a public space for Questions, Ideas & feedback, and Show & tell. Anyone can read; sign in with your existing Vibelets account to start a discussion or reply. Sign-in brings you back to the discussion. Posts use your public nickname shared with Community Gallery, or your Studio profile name if you have no nickname yet. When writing your first post, you can optionally choose a unique nickname directly in the form. Leave it blank to keep using your profile name.

Choose Write a reply under a message to answer that specific post. Replies appear beneath it in a tree; In reply to links back to the parent message. Writing, editing and reporting open directly on the page.

You can edit your own messages while the discussion is open. Messages are plain text: do not include passwords, private app data or other people’s personal information. Keep feedback constructive and respectful.

Report a problem

Use Report on a message to tell the Vibelets administrators about a problem. Reports are private. Administrators can hide individual messages or whole threads, and close a discussion to further replies and edits.

Guide 09

Add Vibelets to ChatGPT

Install the Vibelets plugin, connect your account and build your first app in a ChatGPT conversation.

Before you start

Sign in to ChatGPT and open Customize → Plugins. The screenshots below show the English interface. You will connect a Vibelets account during installation; if you already use Vibelets, sign in to that same account to keep your apps together.

Open ChatGPT

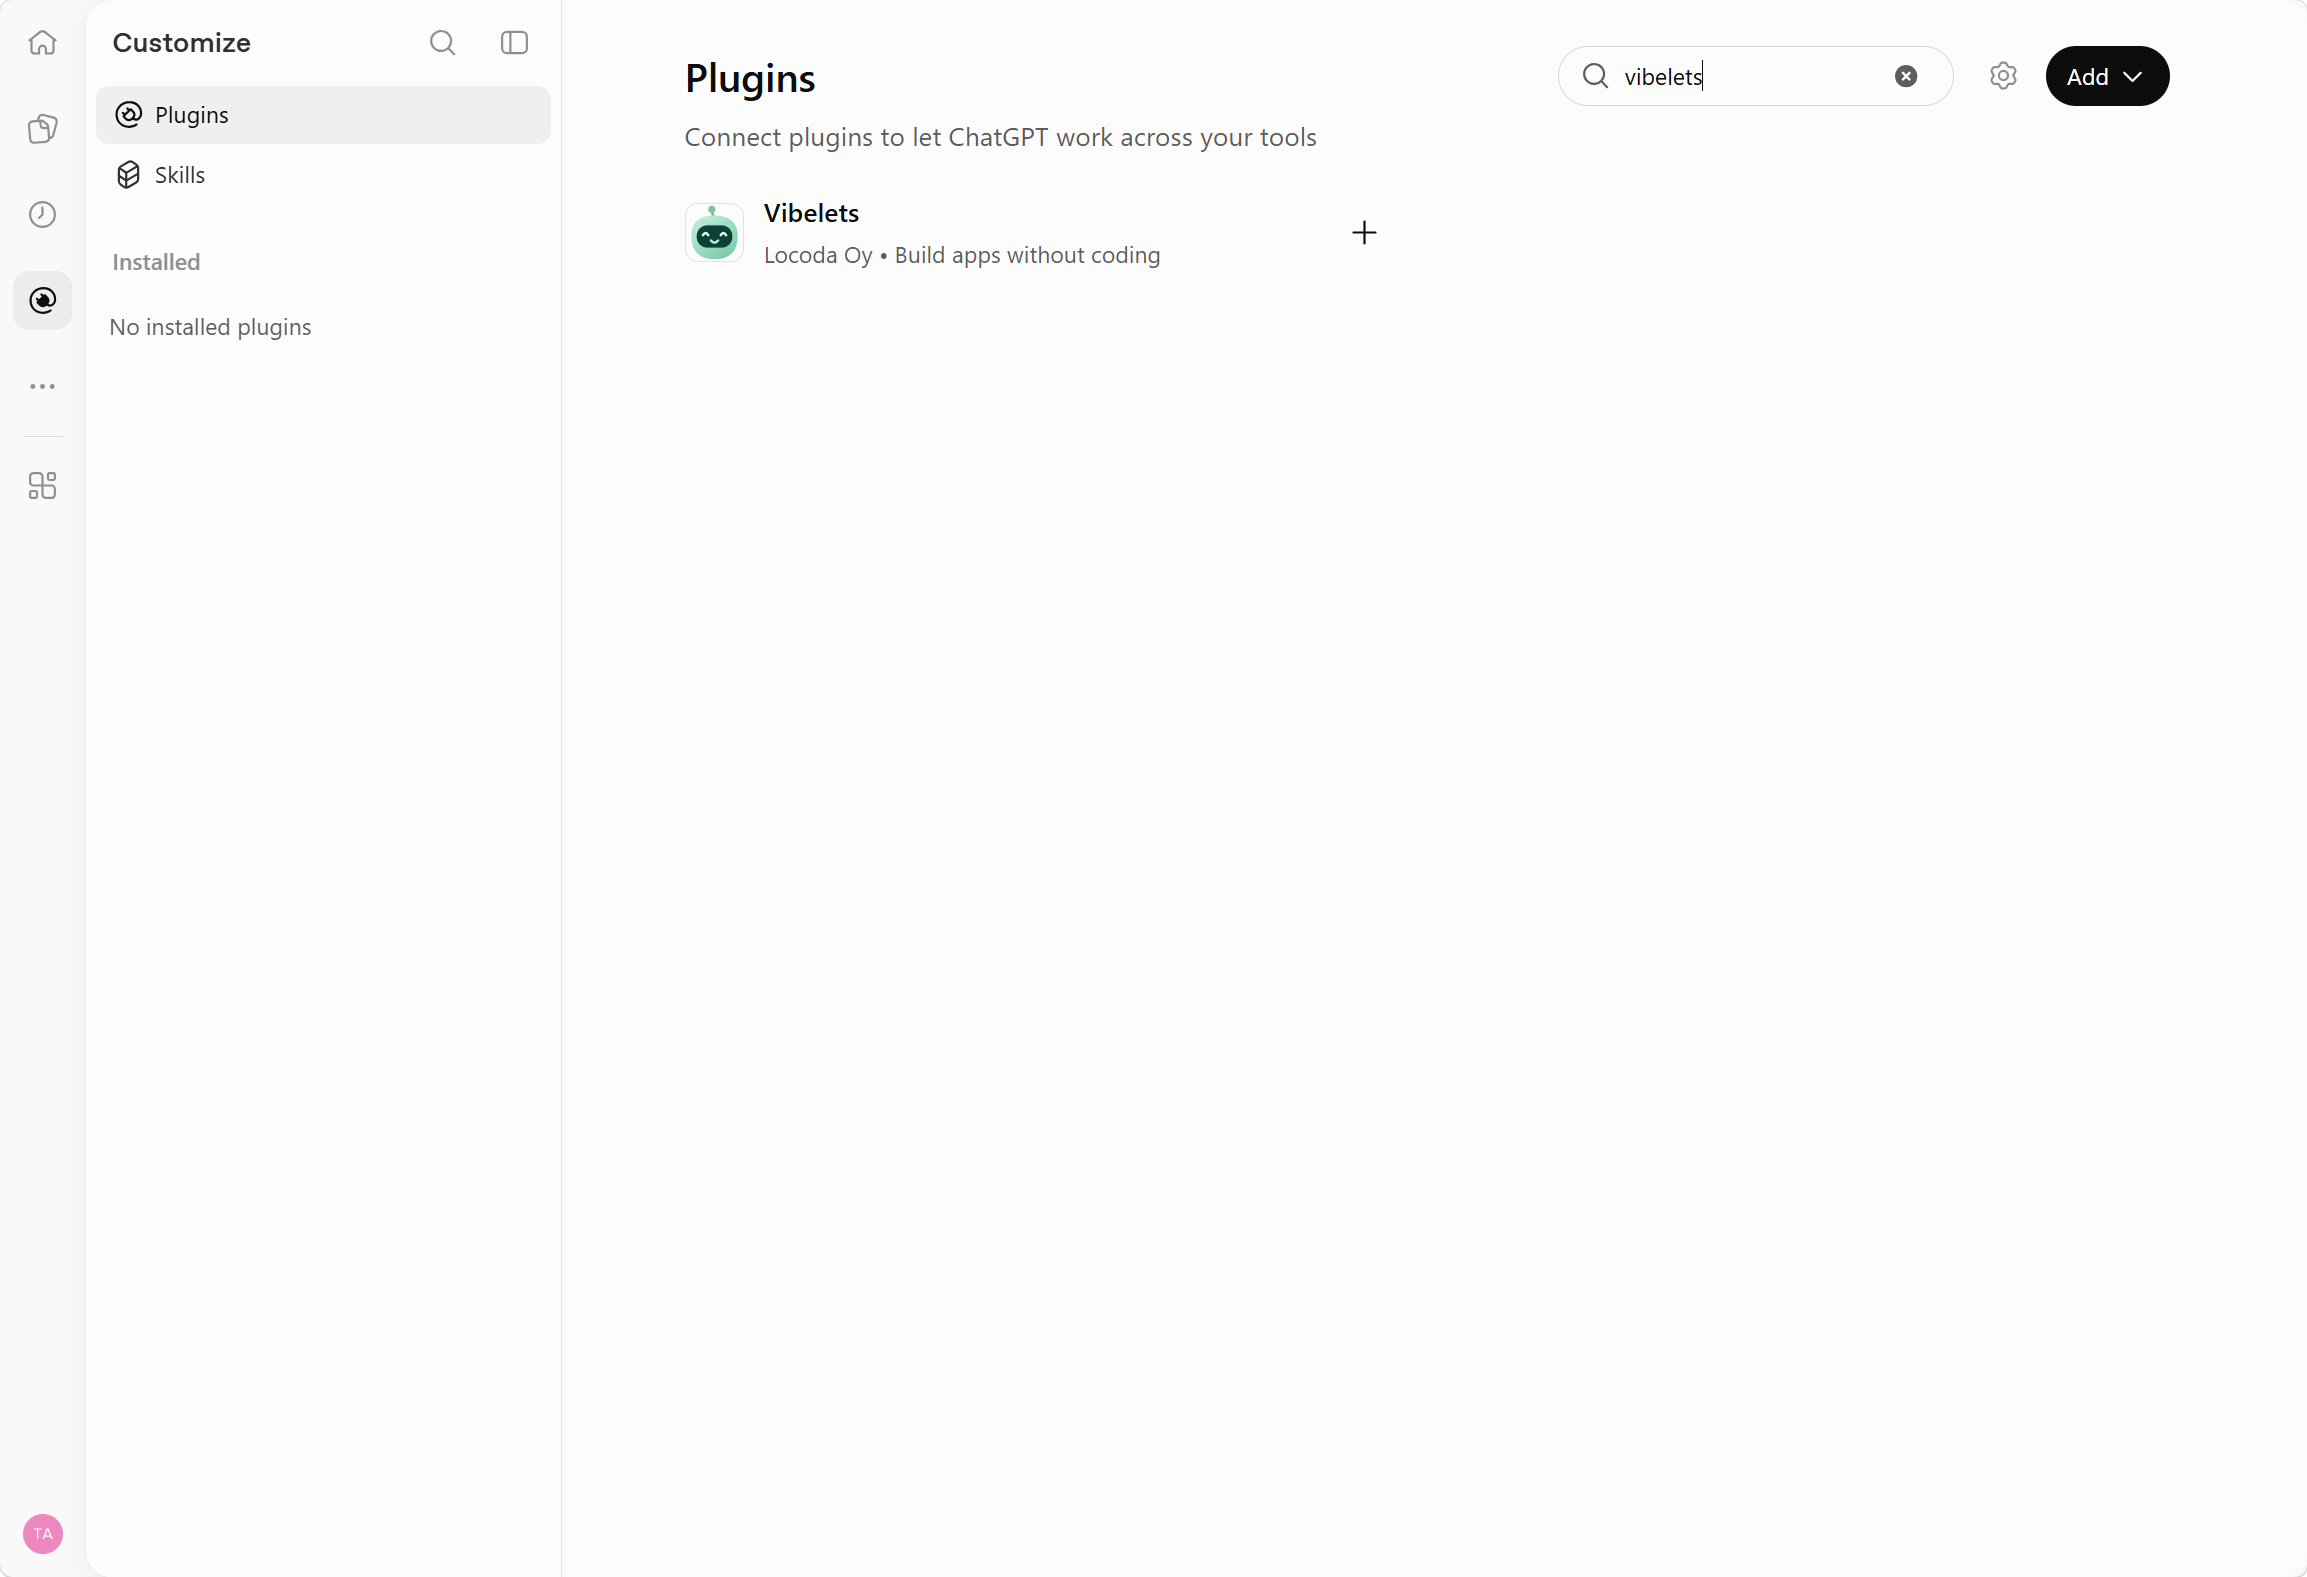
  1. Find Vibelets in Plugins

    In ChatGPT, choose Customize → Plugins and search for Vibelets.

    ChatGPT Plugins search showing Vibelets by Locoda OyView full screenshot
    Search for Vibelets in the Plugins library.
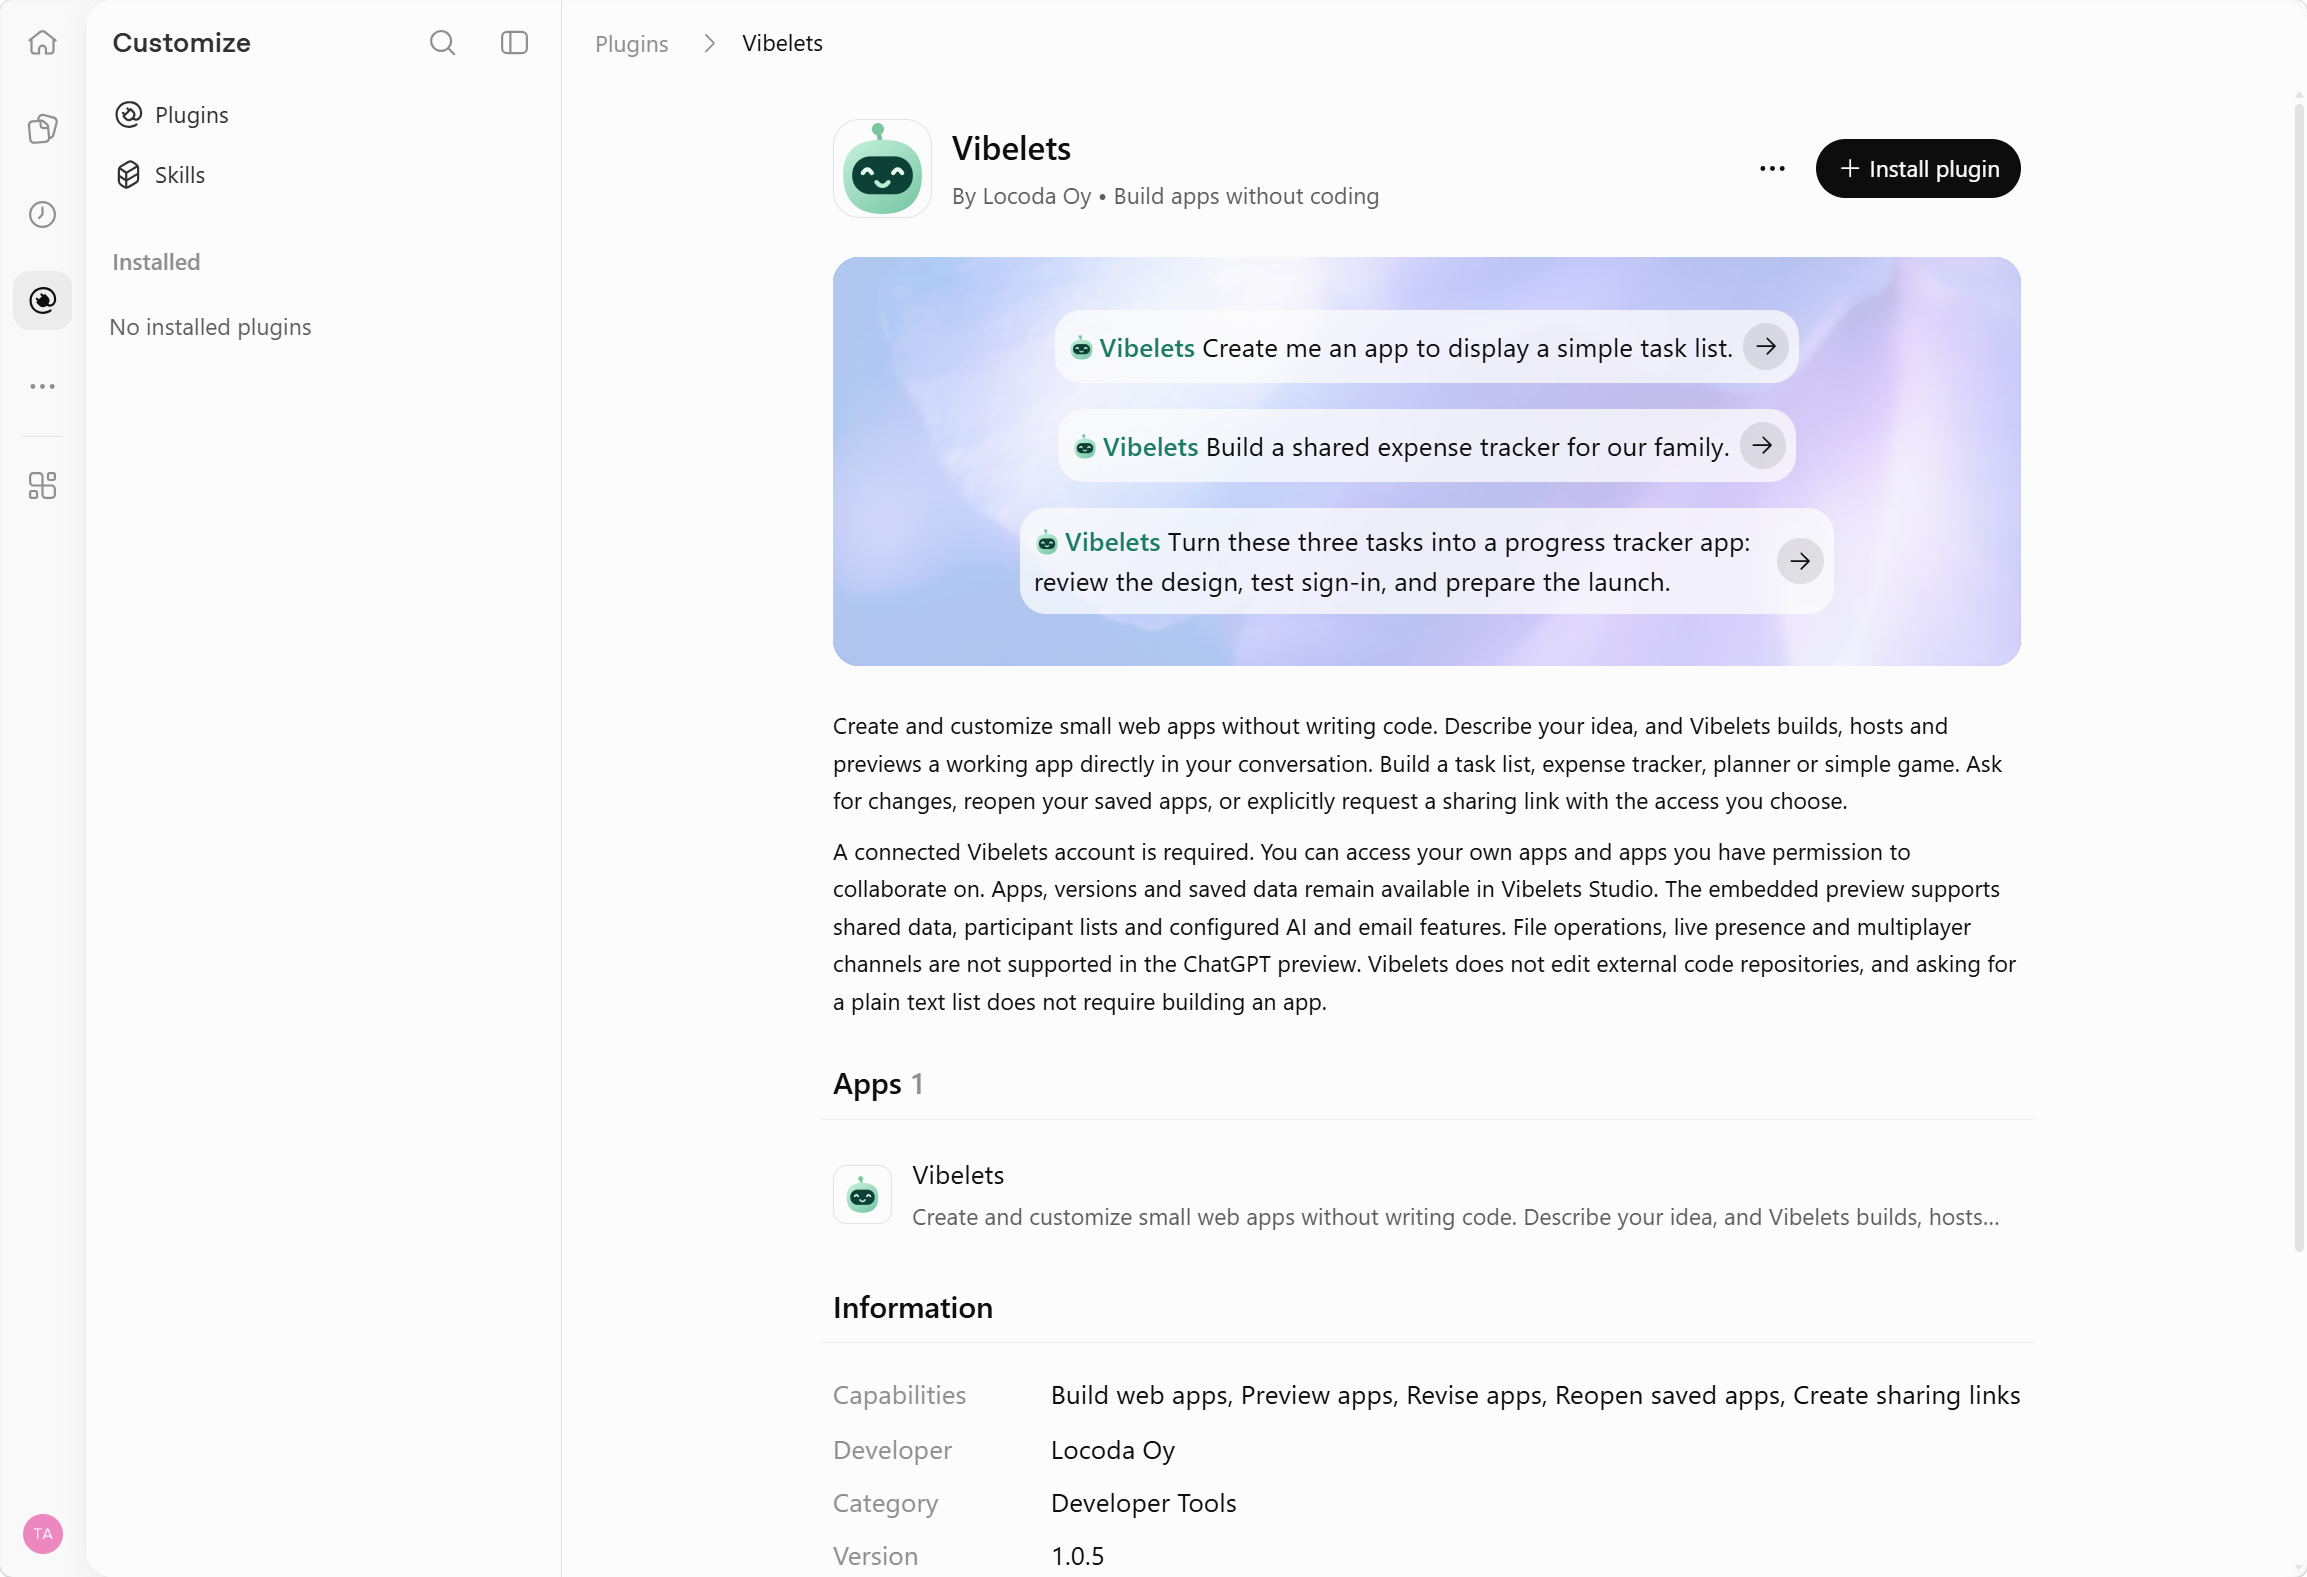
  2. Install the plugin

    On the Vibelets page, select Install plugin in the upper-right corner.

    The Vibelets plugin page with the Install plugin buttonView full screenshot
    The plugin page shows the Vibelets logo and Locoda Oy as its developer.
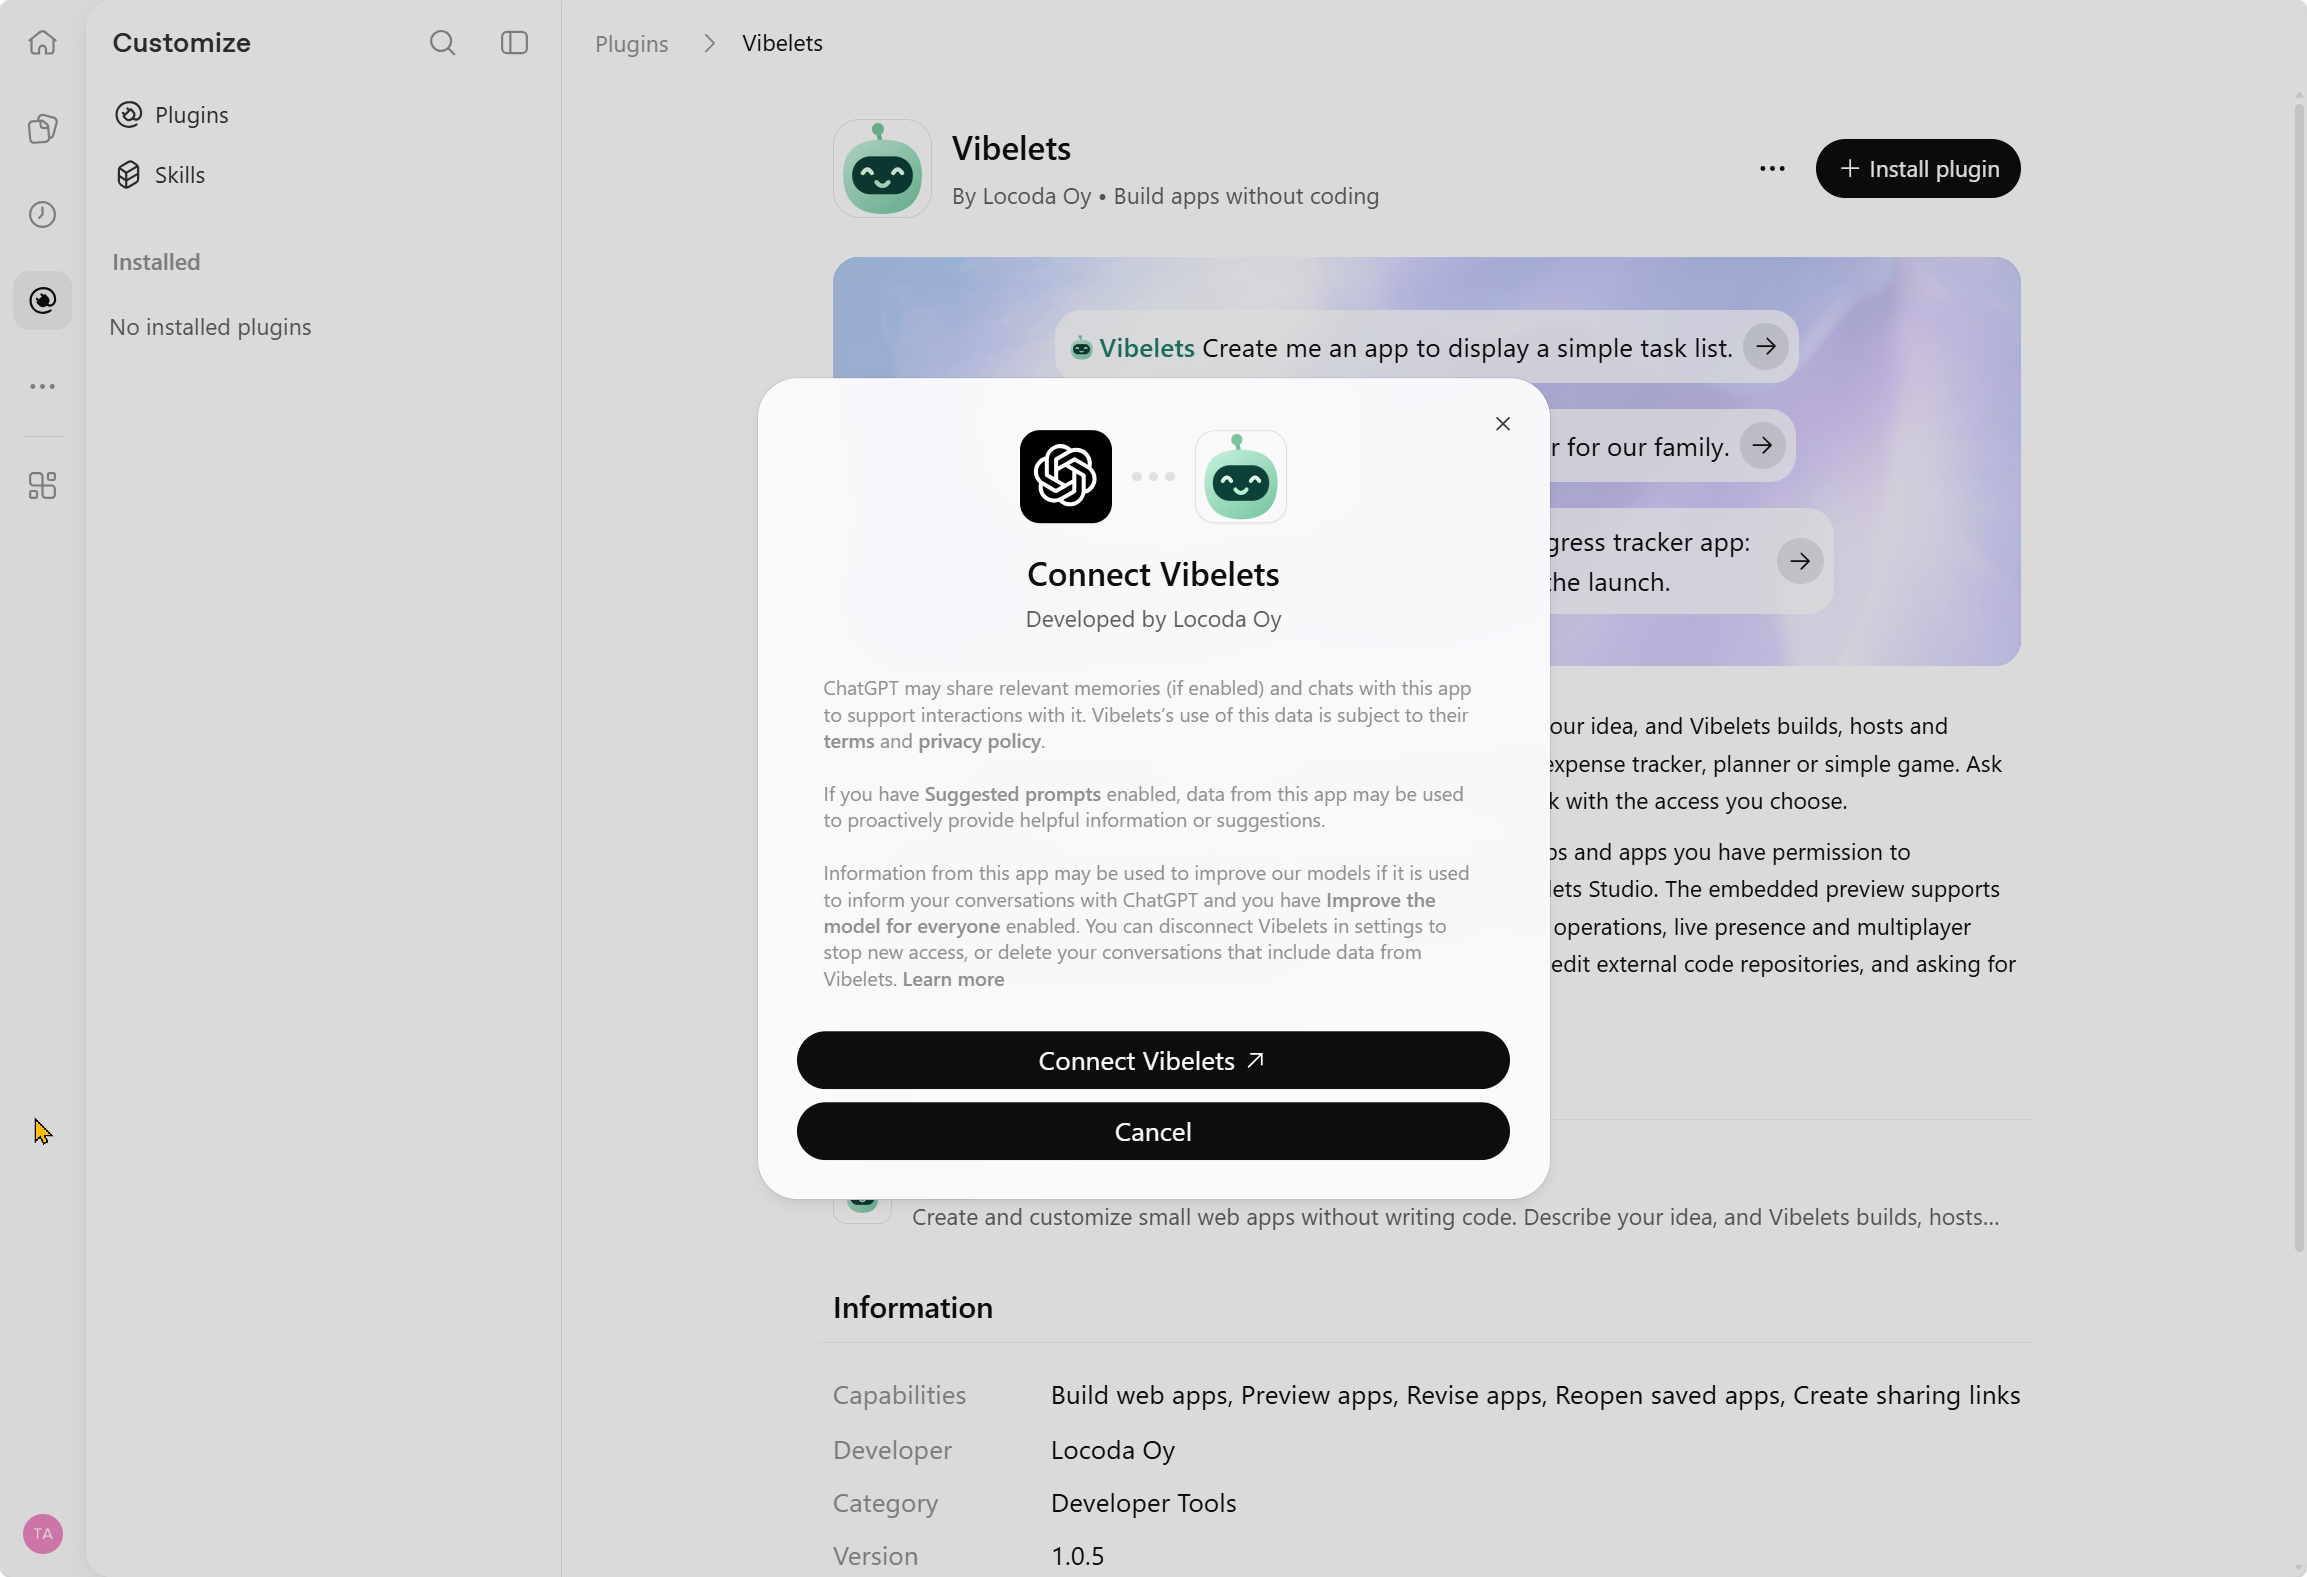
  3. Connect Vibelets

    Review ChatGPT’s connection information, then select Connect Vibelets. This opens the Vibelets sign-in and permission flow.

    ChatGPT connection dialog with the Connect Vibelets buttonView full screenshot
    Select Connect Vibelets to continue to your Vibelets account.
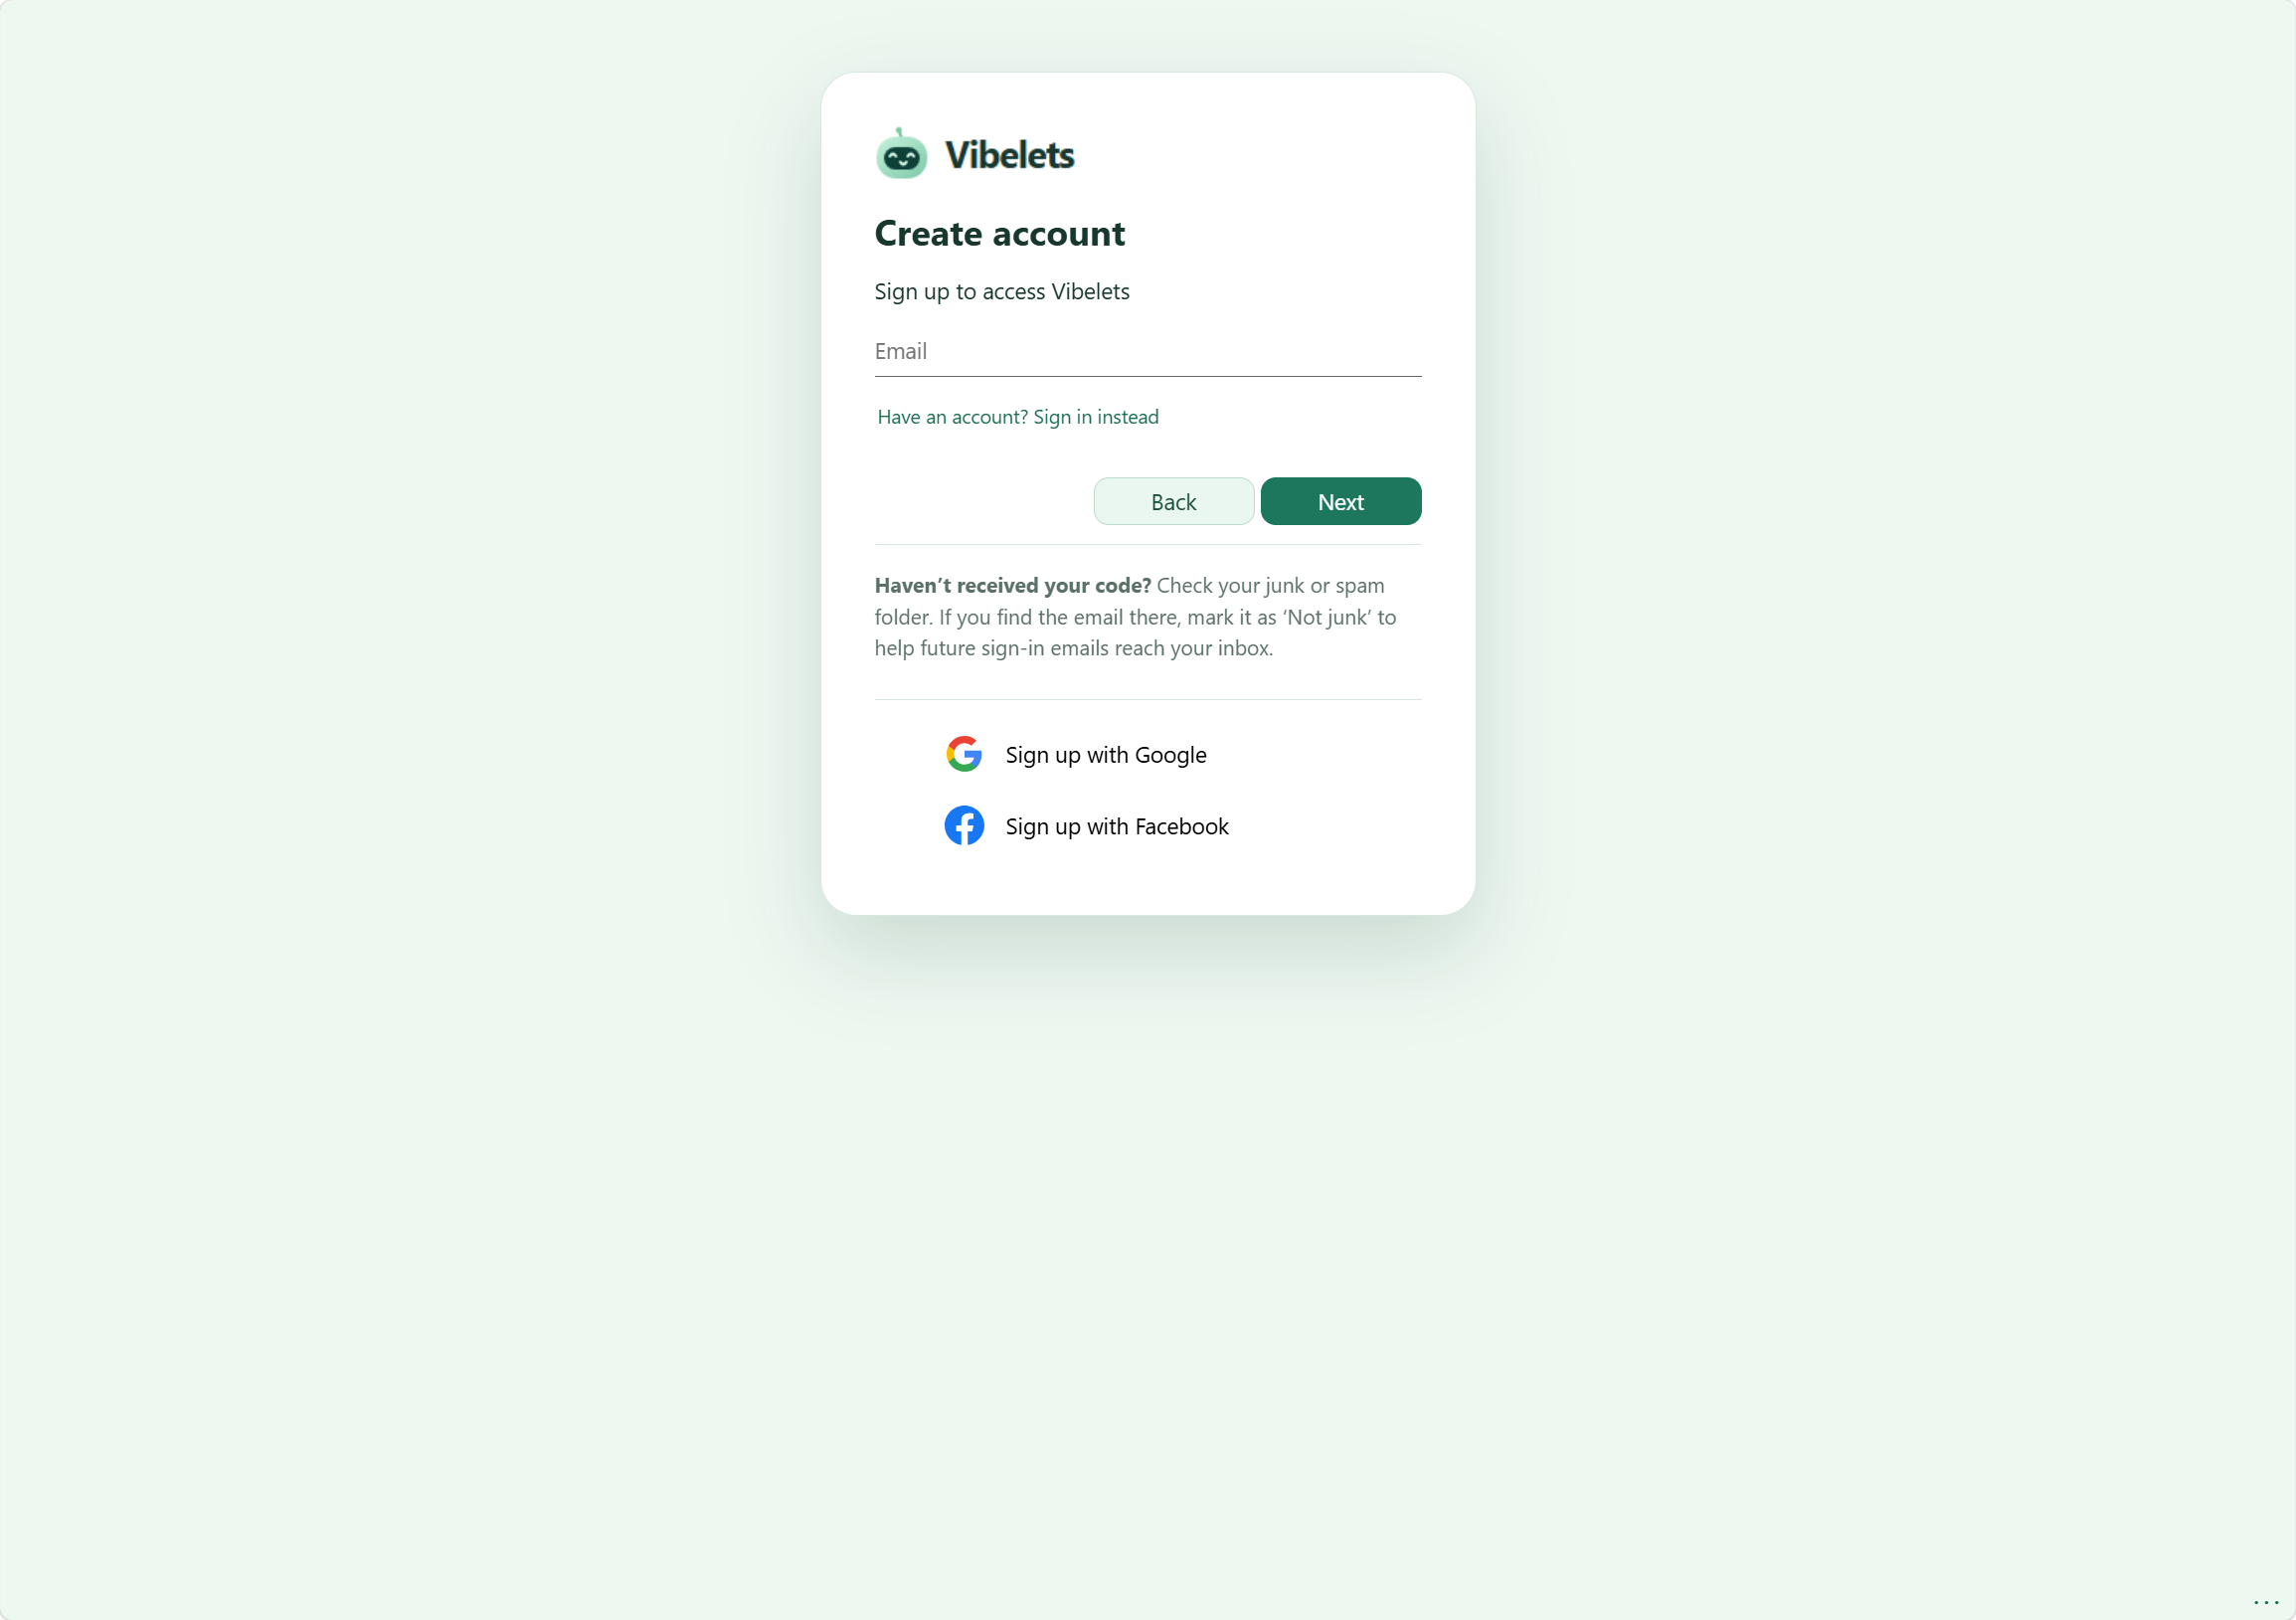
  4. Sign in or create a Vibelets account

    If you already use Vibelets, sign in to that same account. On the Create account screen, choose Sign in instead and use your existing sign-in method.

    New to Vibelets? Enter your email and select Next, or choose Google or Facebook. Follow the sign-up steps to create your account.

    Vibelets Create account page with email, Google and Facebook sign-up optionsView full screenshot
    Create an account or choose Sign in instead. If you are already signed in, you can go straight to the next step.
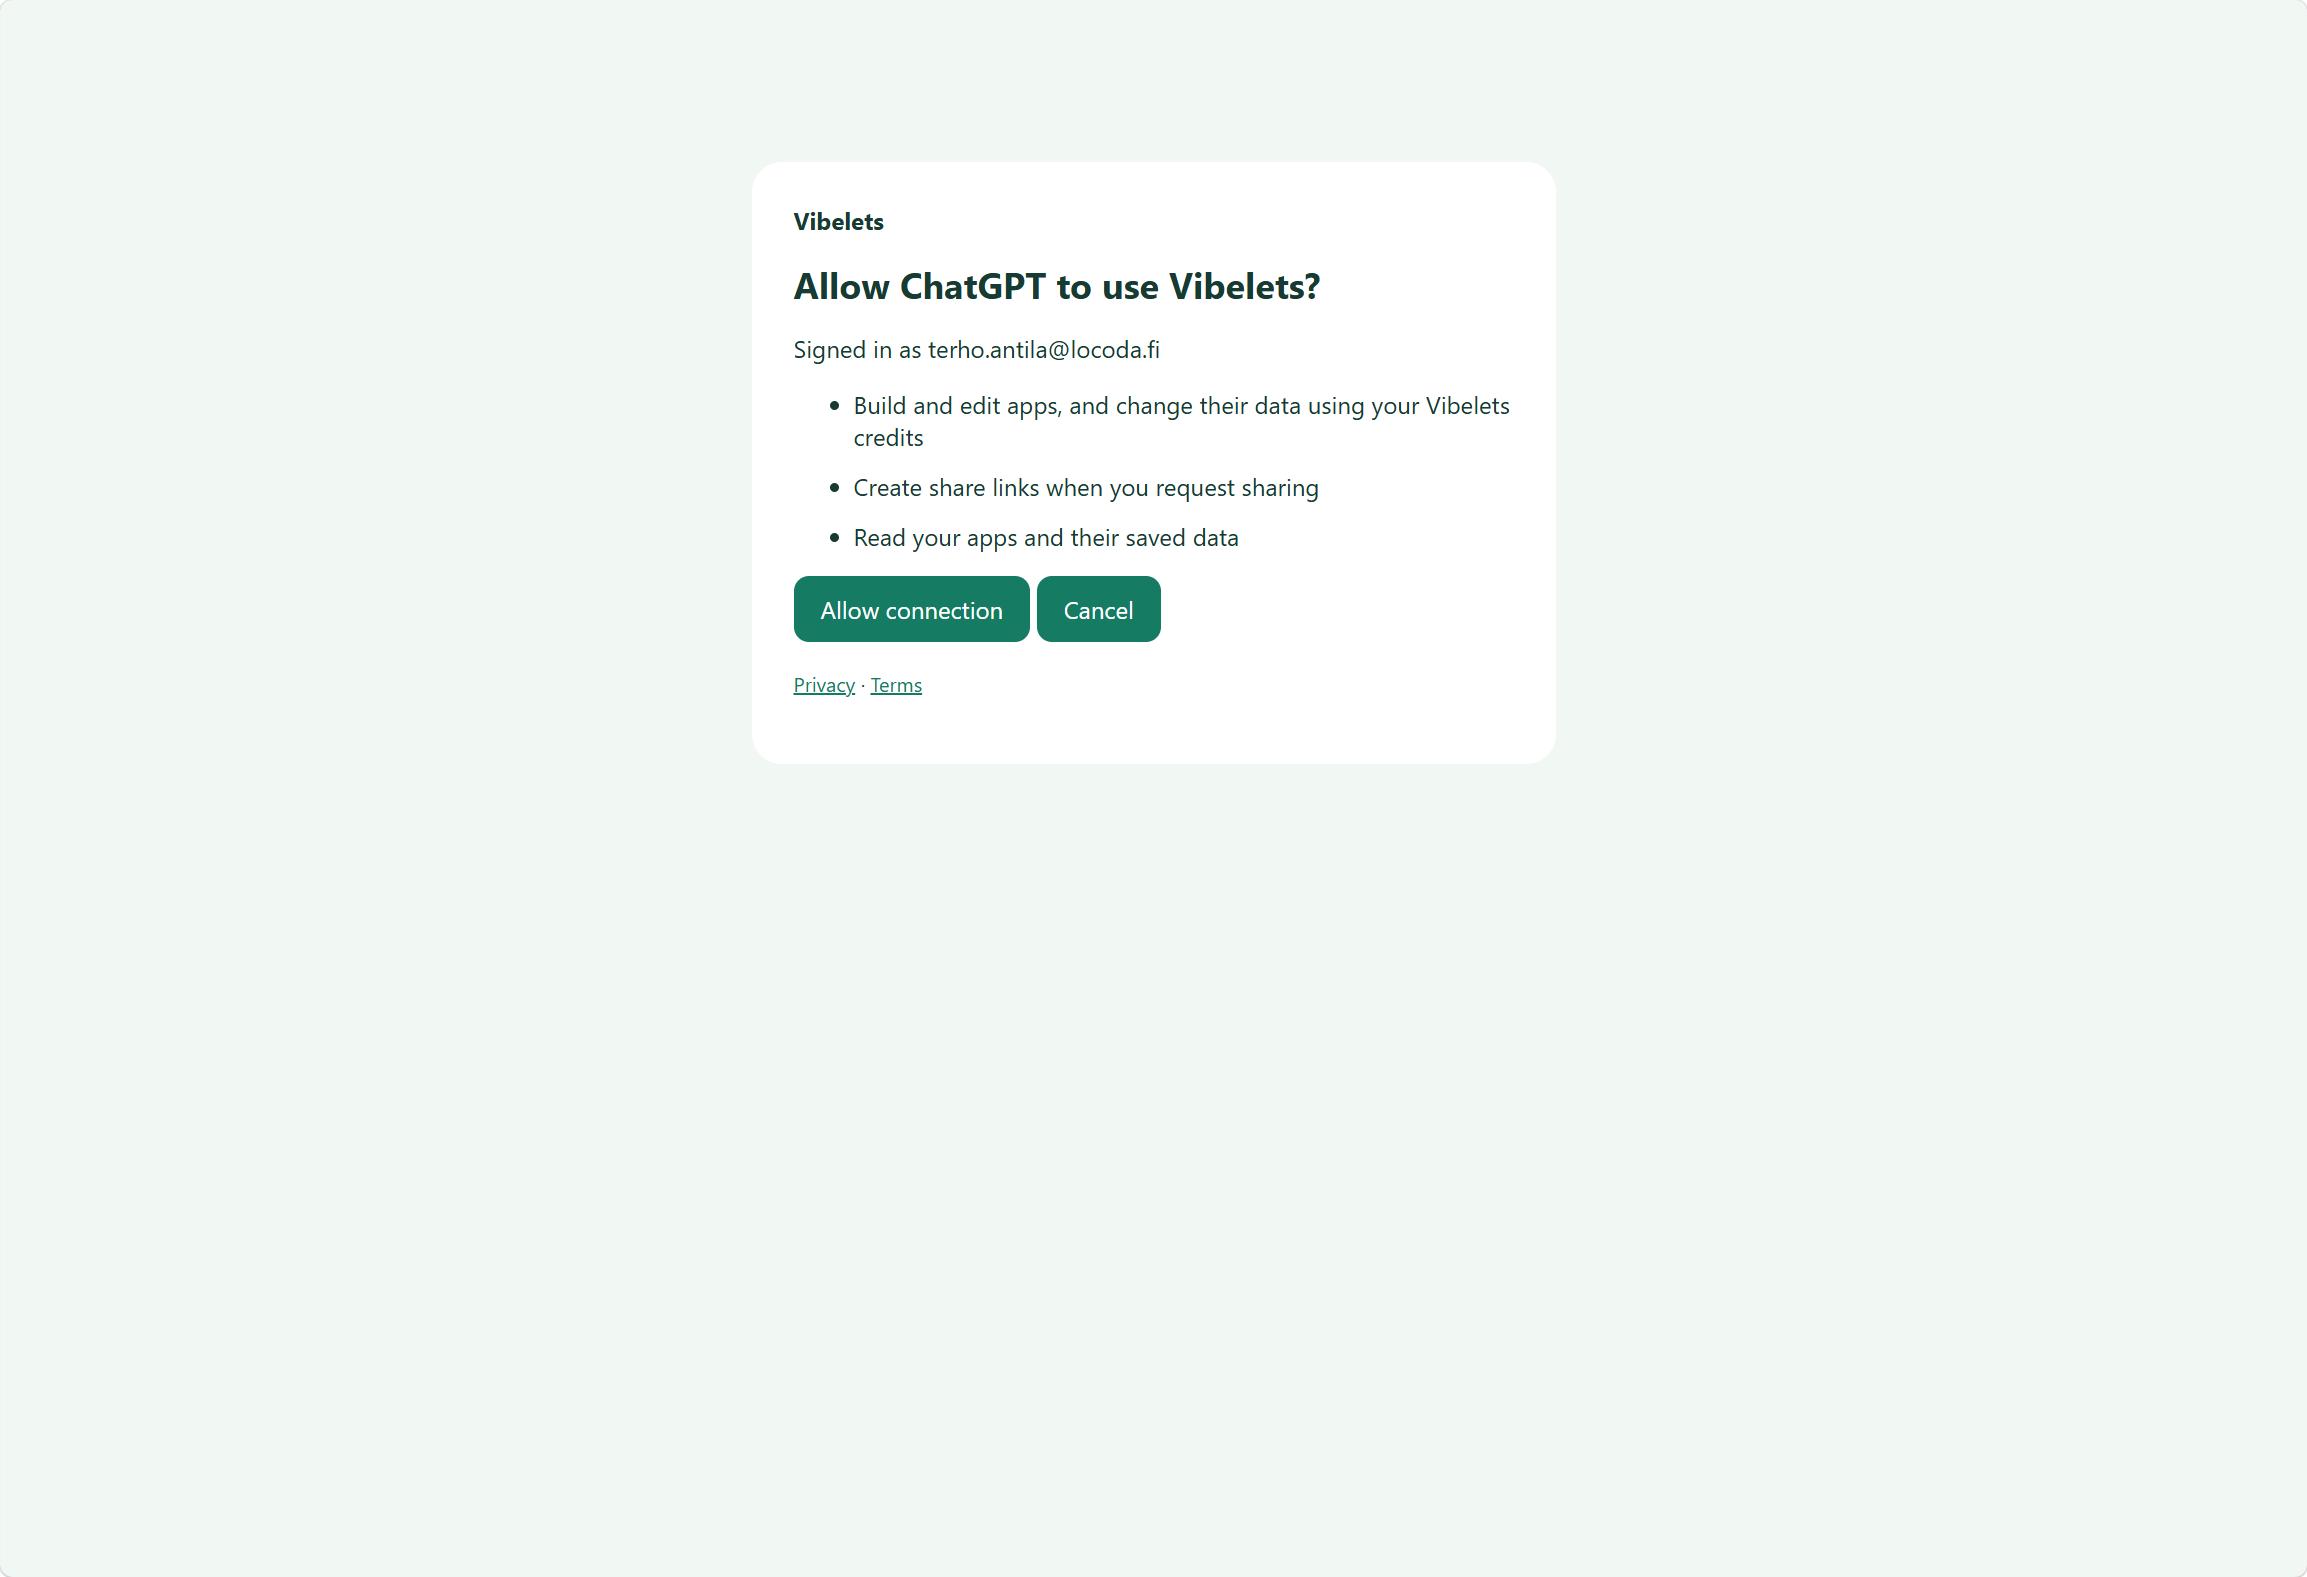
  5. Allow the Vibelets connection

    On the Allow ChatGPT to use Vibelets? page, check the signed-in account and review the permissions. They cover reading your apps and saved data, building and editing with your Vibelets credits, and creating links when you request sharing.

    Vibelets permission page with the Allow connection buttonView full screenshot
    Review the requested access before allowing ChatGPT to use your Vibelets account.

    Select Allow connection to finish connecting your account.

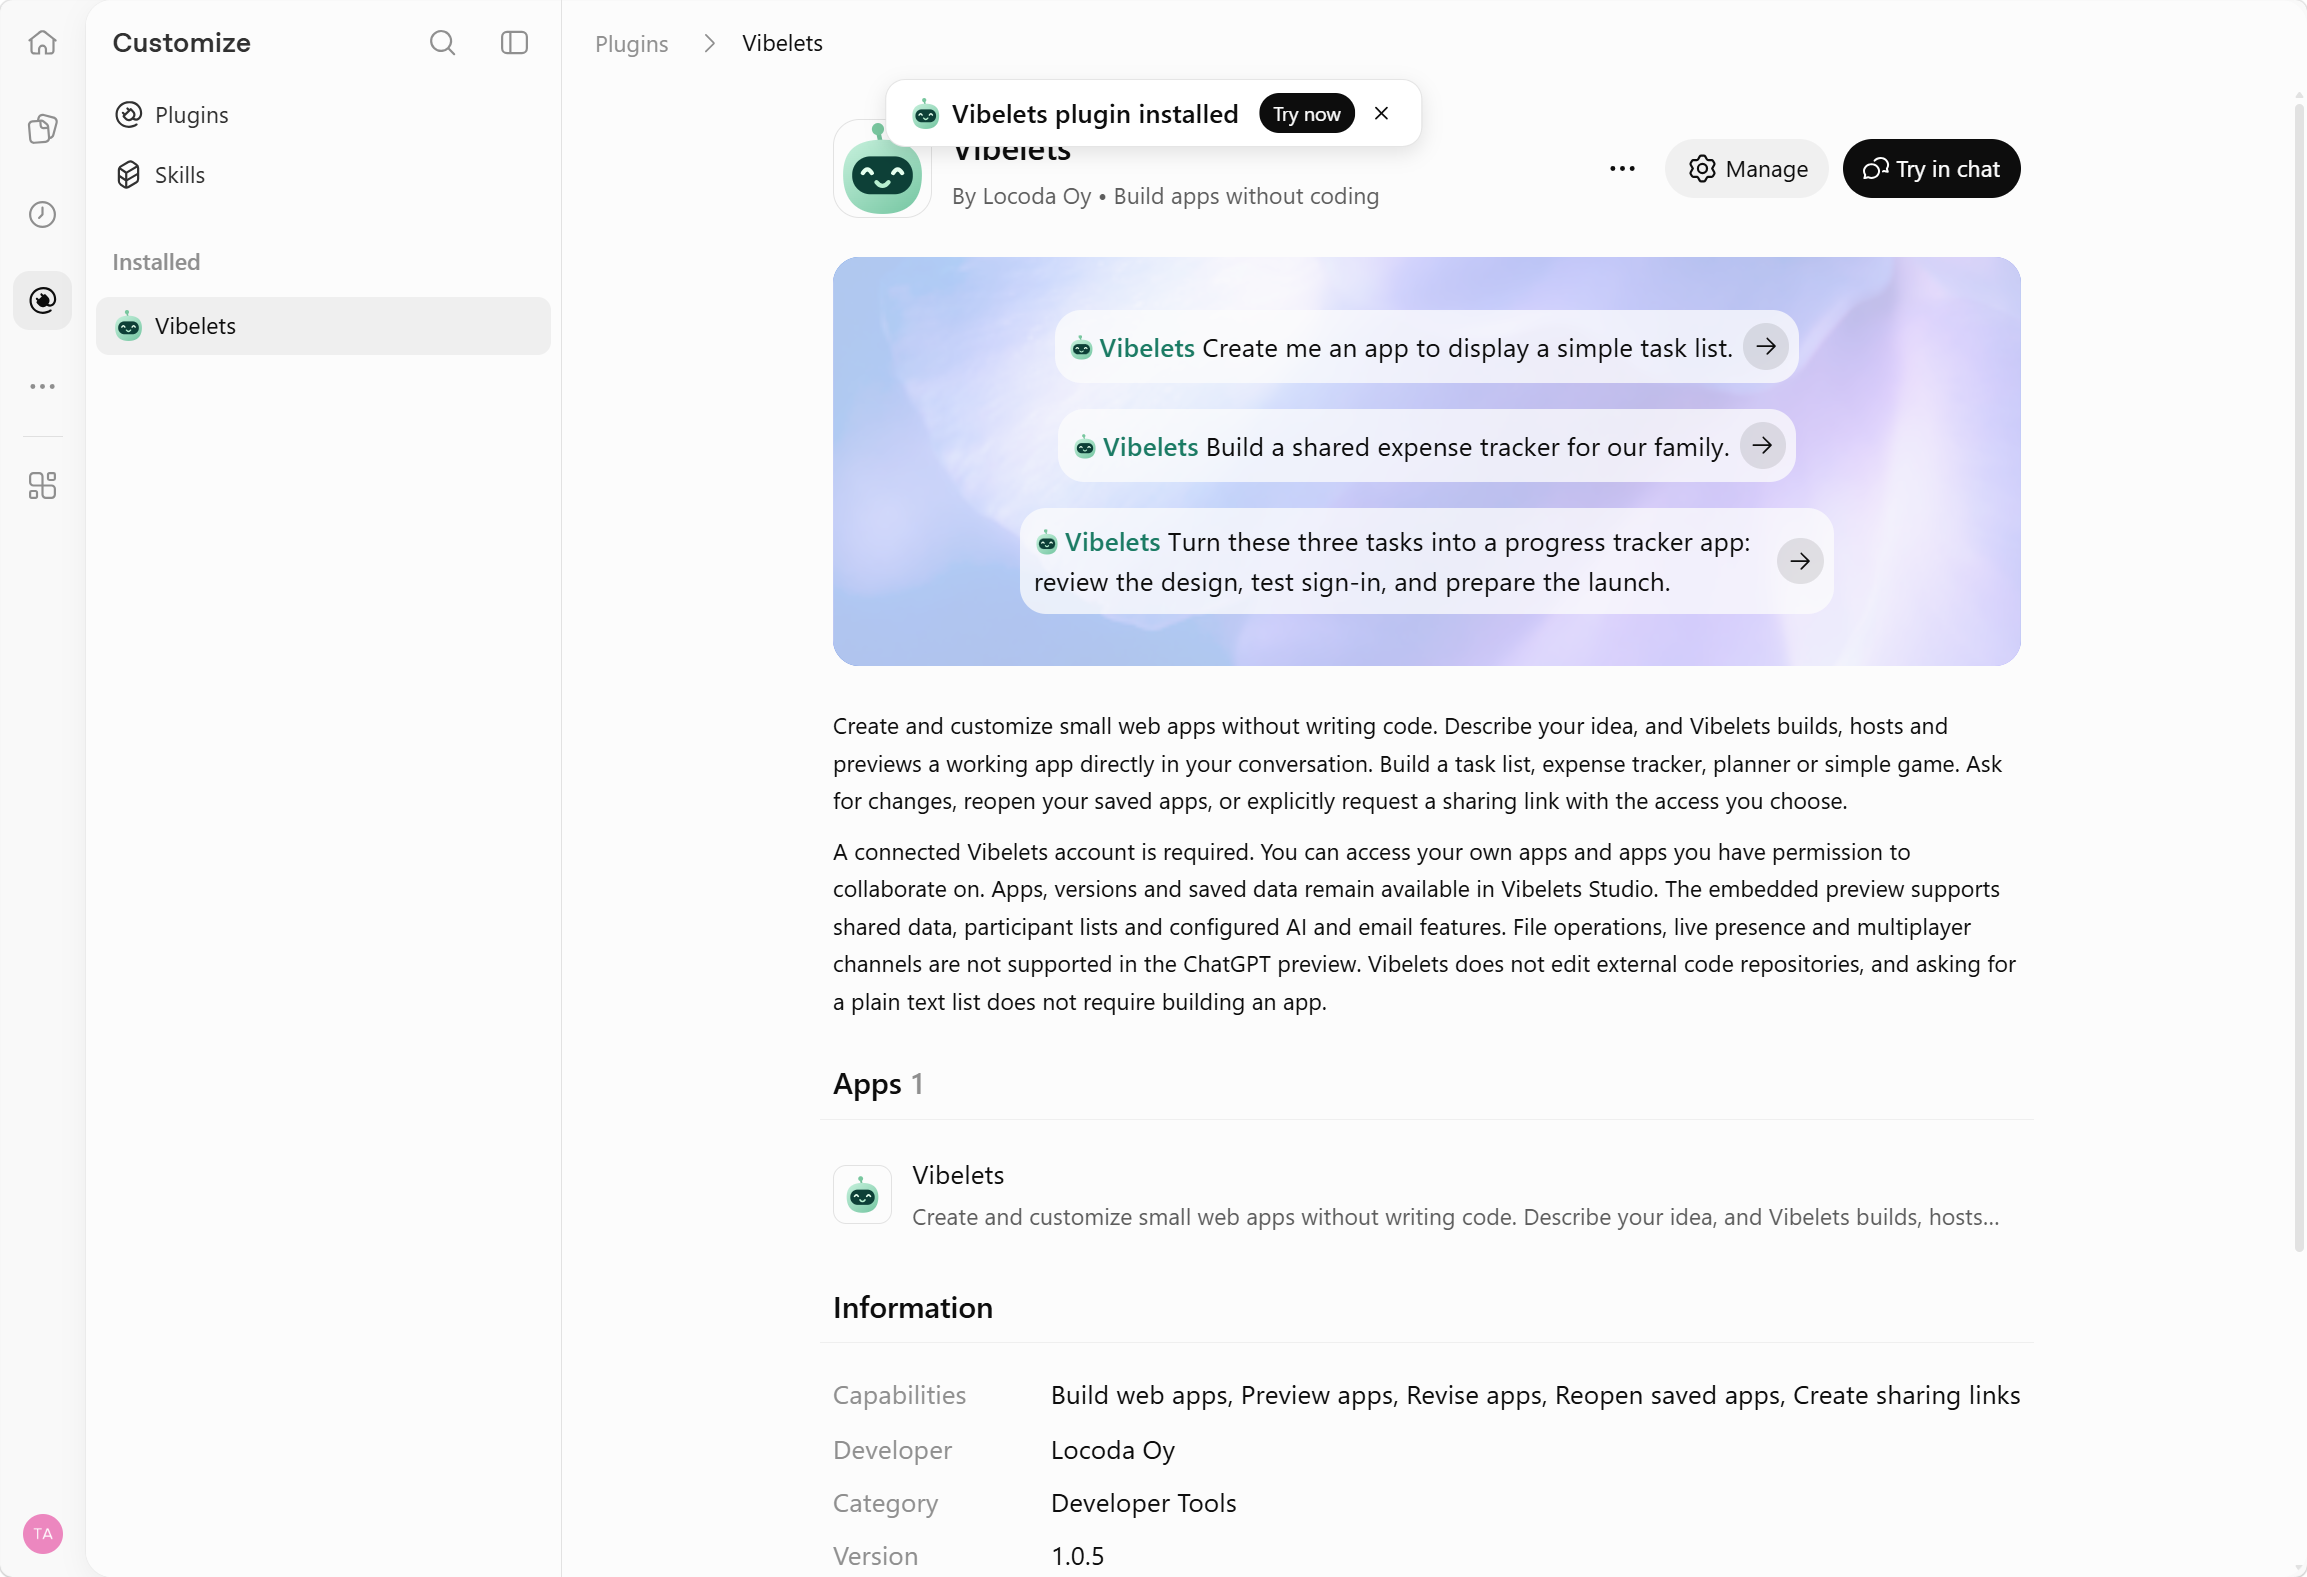
  6. Open a chat with Vibelets

    ChatGPT confirms Vibelets plugin installed. Select Try in chat on the plugin page, or Try now in the confirmation.

    Vibelets plugin installed confirmation and the Try in chat buttonView full screenshot
    Try in chat opens a conversation with Vibelets selected.
  7. Describe the app you want

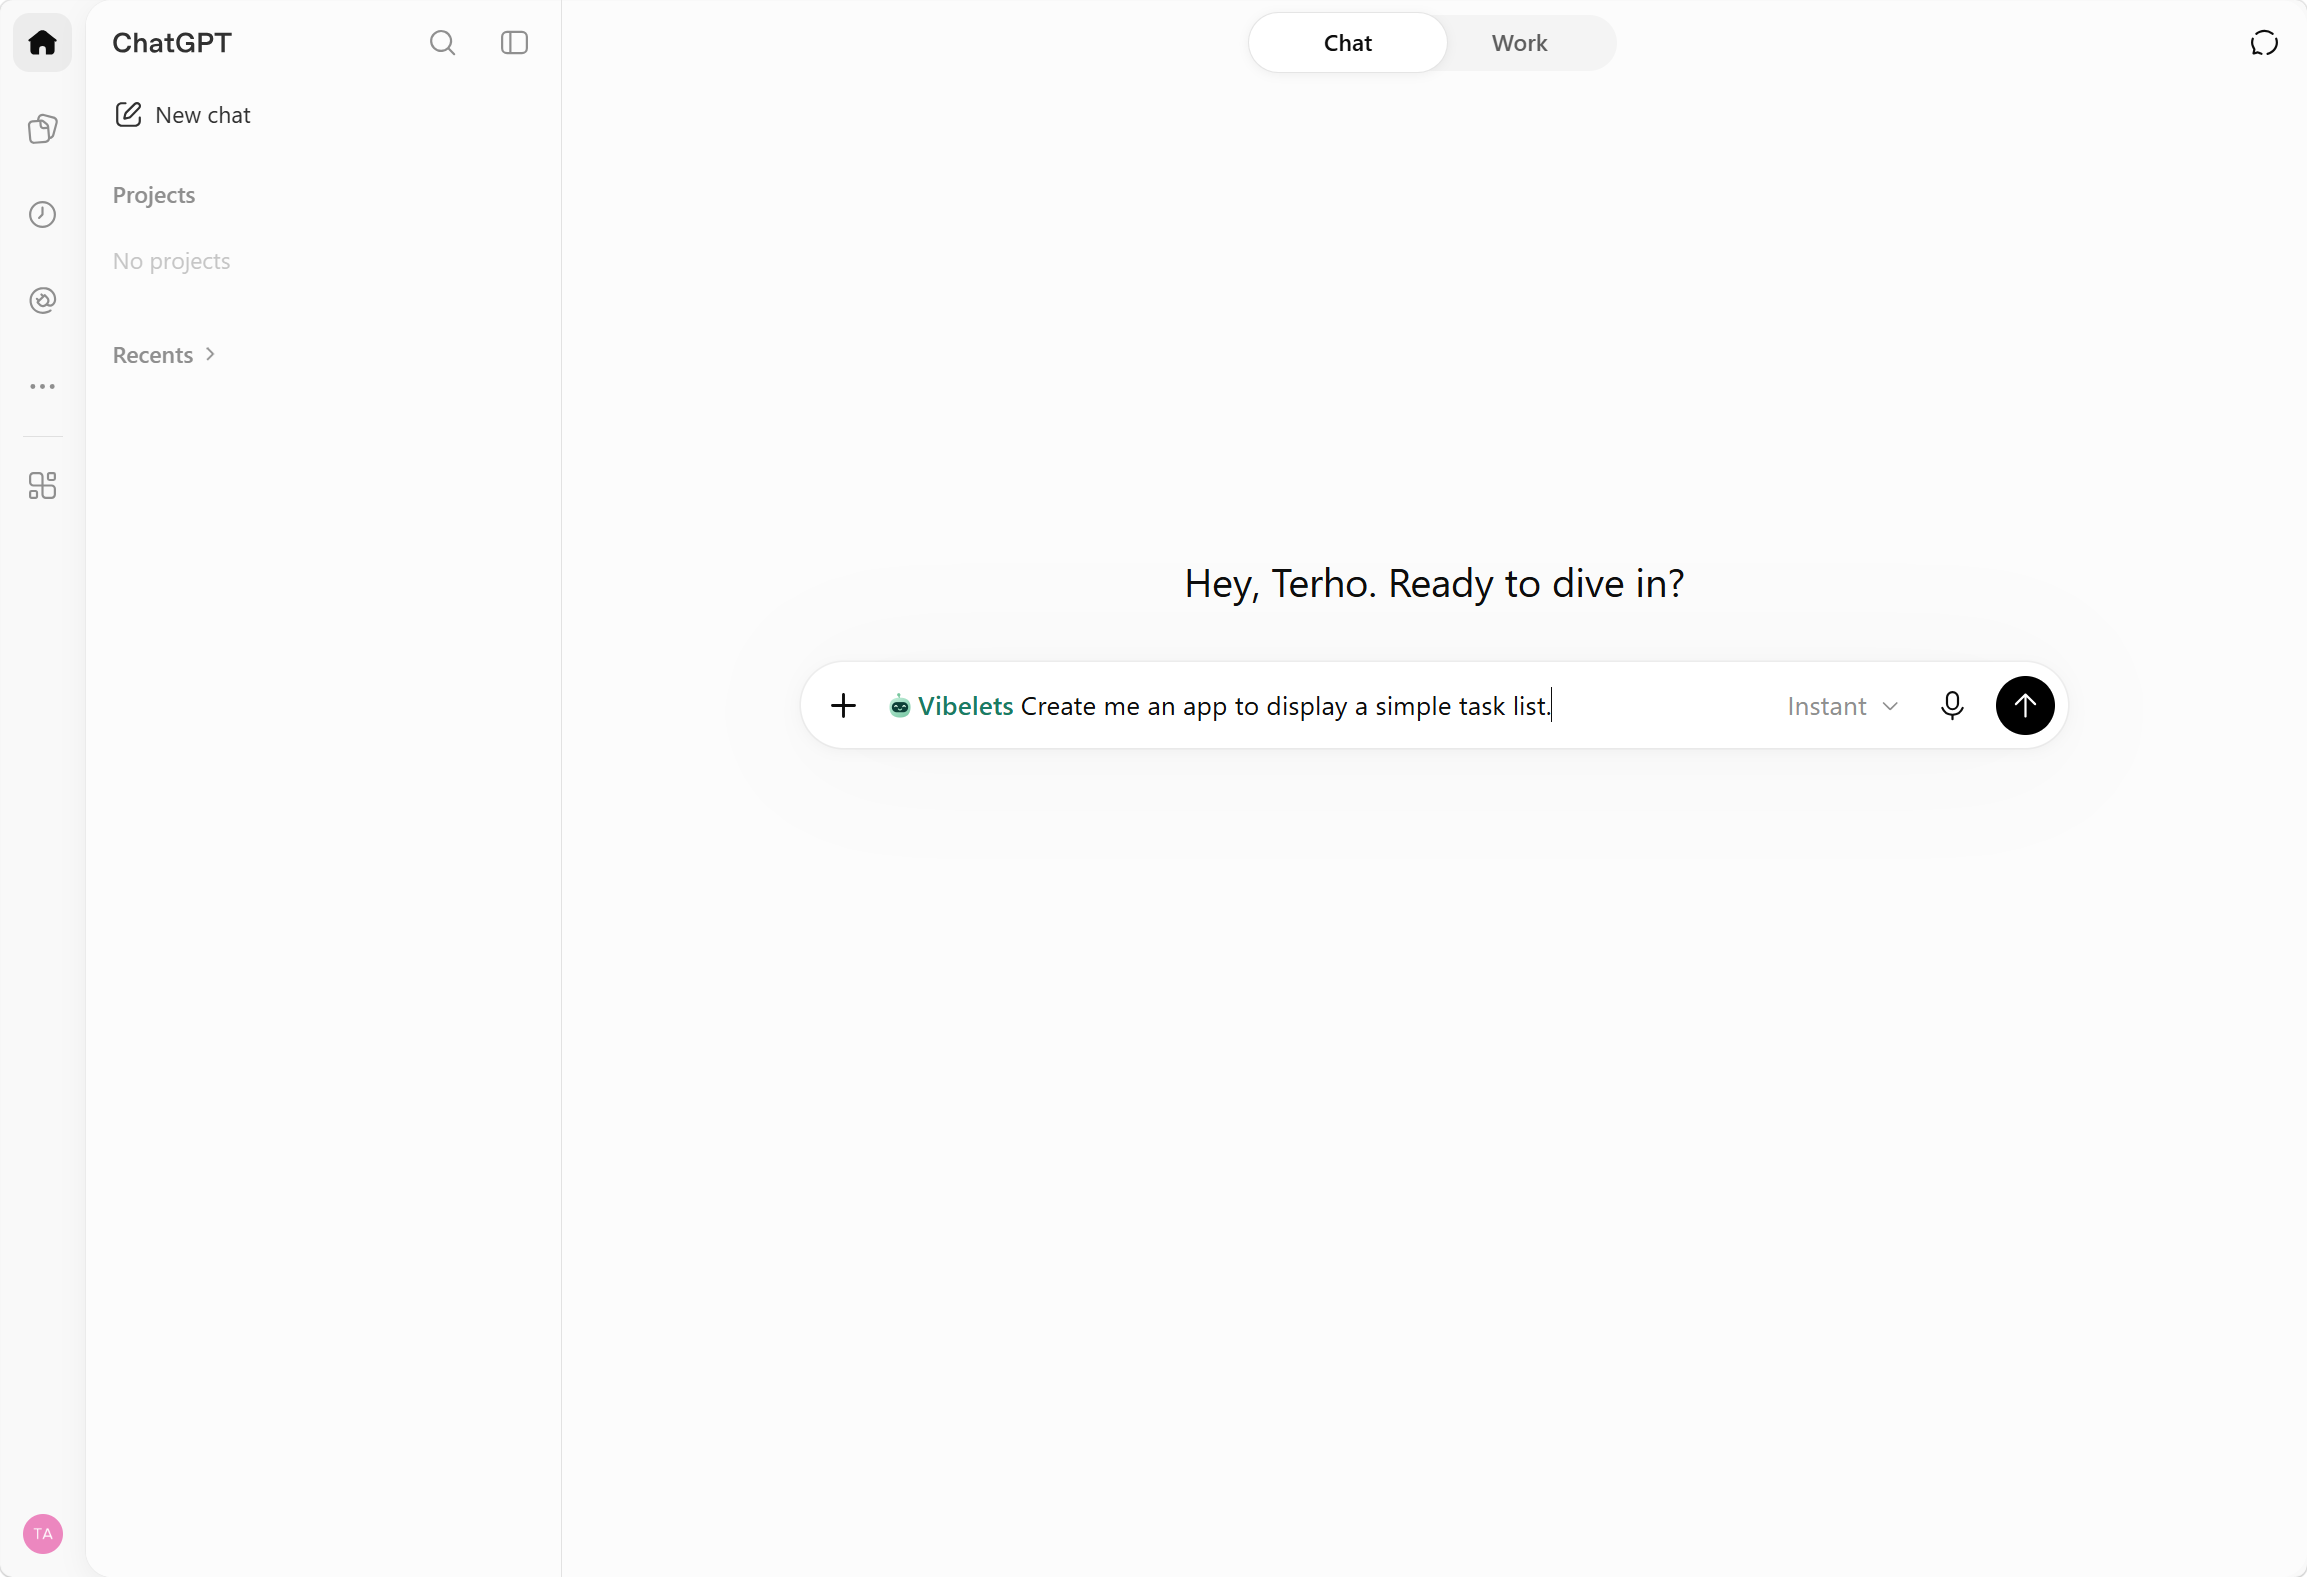
    Make sure Vibelets is selected in the prompt box. In a new chat, you can type @ and choose Vibelets. Send a request such as:

    Create me an app to display a simple task list.

    ChatGPT prompt box with Vibelets selected and a request to build a task listView full screenshot
    Select Vibelets, describe your app and send the prompt.

    Try the app in the preview. To improve it, ask for a specific change, such as “Add due dates and show unfinished tasks first.”

Can’t find the plugin or start using it?

Check that you are in the intended ChatGPT account and workspace. Managed workspaces can restrict which plugins you can install; your workspace administrator can check access.

If Vibelets is already installed, start a new chat and select it with @. If the connection asks you to sign in again, use the same Vibelets account.

For a connection or preview error, contact Vibelets support with the visible error and the step where it happened.

Screenshots show the English ChatGPT interface. See also OpenAI’s plugin instructions .